Teachers! Do you want an even better way to engage, share and communicate with your parents? A private Facebook group for your classroom is the perfect answer. They are fairly simple to setup, super easy to use on a daily basis, and what parent is not on Facebook these days? However, with school / student privacy concerns, you need to ensure your group is setup properly. This article not only shows you how to create a Facebook Group for your classroom, it also explores the benefits of a group, critical differences and points about groups, and other topics such as using Facebook as a communication tool with your parents.
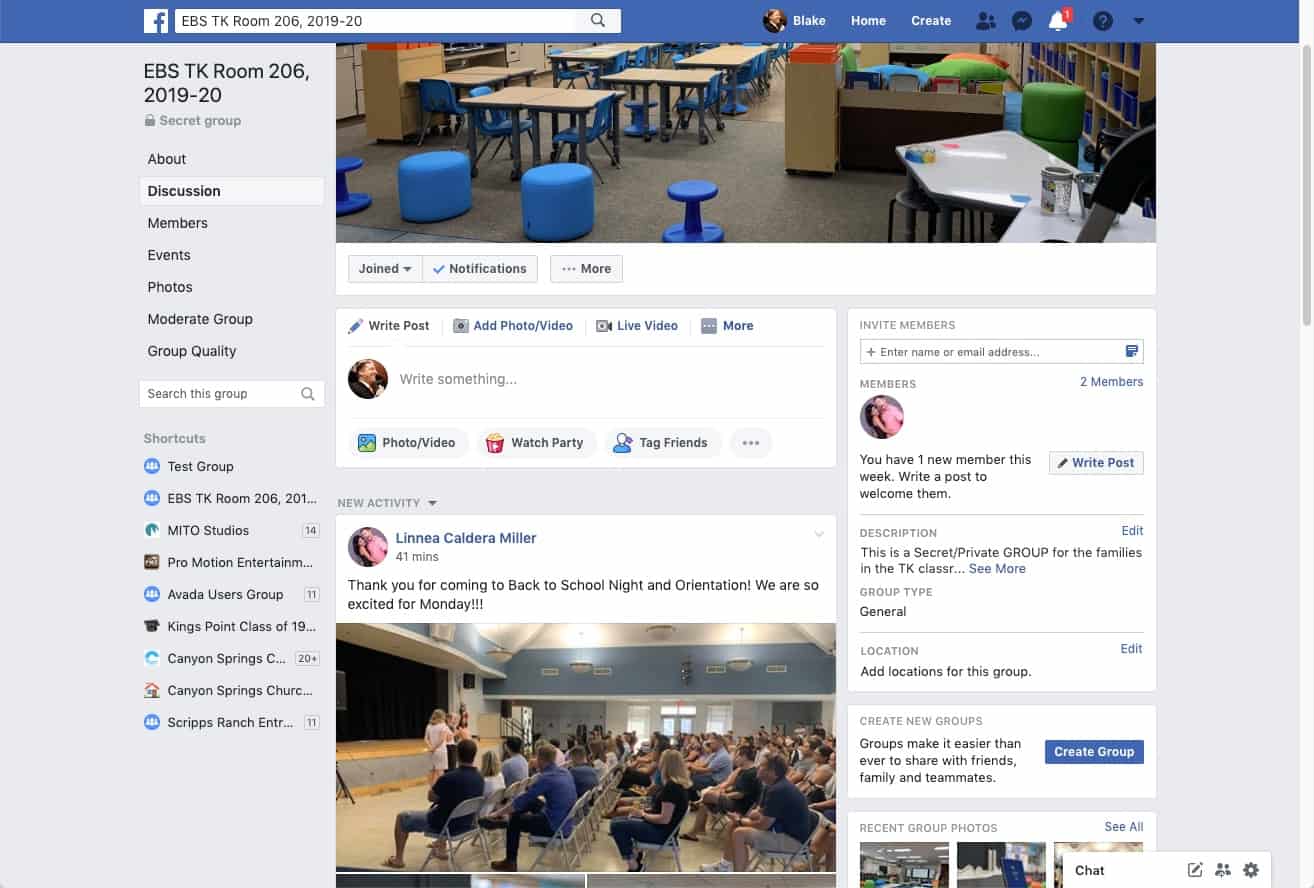
My wife’s private Facebook Group for the 2019-20 school year.
Back Story: My wife is a 20+ year elementary school teacher and has always had a special knack to truly love her students, provide an incredible and safe atmosphere for them and make great connections with the parents. Another thing she does great at – communication. Like with any one or any brand, organization or group, communication and information is extremely valuable for building trust and likes (not in the Facebook sense). She also loves “tech” (though I am the true tech geek in the house) especially when it makes her job easier or better. What started 18 years ago as a physical newsletter every month, has turned into a cross connected digital environment including a website and a blog where the posts are automatically emailed out to her parents every week. And with the popularity of social media and Facebook, it includes a private Facebook group for each of her yearly classrooms. And since all of this communication and marketing *is* my day job, it made sense to help her make a Facebook group for her class. We have been doing it for a few years now and she loves it.
Her parents love it more!
First, why a Private Facebook group for your Classroom?
There are a ton of reasons and benefits of creating a Facebook Group for your classroom.
- Creates a platform to share and engage with your parents.
- Similarly, allows your parents to engage with each other. (more on that below)
- Offers you another method to communicate with your parents (though I’ll discuss the flipside to this later)
- It’s very fast and easy to maintain – publish notes, updates, pictures and videos. you can post something within minutes. (Who is not logged into facebook all of the time?)
- It’s private. No one outside the group can see what’s going on inside, who’s in the group, or even find the group by searching or direct link. (Facebook does a very good job at making private groups just that . . . private)
- A majority of parents are on and use Facebook regularly.
- It’s Free. Very good for teachers ?
- Parents get to see what’s going on in class – sometimes as it’s happening “live”
- Gives you an archive of the class / year. (There is no reason to delete it – you and your parents can look back at any time.) You’ll be setting up a new group for each class.
- Do you have any more thoughts? Feel free to leave a comment at the end of this article
Before we get into the nuts and bolts, there are a few important topics to know and/or consider.
Page vs Group
It’s important to know that we are creating a Group, not a Page. A page is public in nature, does not allow for much community or engagement (outside of likes and comments) and users aren’t notified if something happens on a page. A page is more like a website – commonly used by businesses, brands and organizations. Your school may very well have a page. Ours does – https://www.facebook.com/EBSelementary/. (Note there is no /group/ in between facebook and the name). While your classroom could have a page, it’s not likely and I don’t recommend it. A group on the other hand is designed around community and can be made private, etc. It’s more engaging as a community and comes with other features.
Other “Classroom” or “Community” Apps
There are other apps which have been around for a while and are popular. ClassDoJo is one of them, and Shutterfly is another. ClassDoJo is alot like Facebook in how it works, how it looks and what it can do. Shutterfly is a good sharing site, but it’s a bit clunky, not much of a “social community” to it and a bit foreign. Those are good and serve their purpose but I like Facebook because: it’s super easy (FB does a good job at making “social” fairly easy), very popular (who isn’t on Facebook?) and it’s one less app/password to have to deal with.
Group Privacy = Secret & Hidden
UPDATE 2020 – in mid/late 2019, Facebook changed (and simplified) its Group Privacy options. Now there are only two: Public and Private. You’ll want to choose “Private”. There is also a “Hide Group” section and you’ll want to choose “Hidden” which means only members can find the group if they search for your group on Facebook. Here is the official FB help section for more info: https://www.facebook.com/help/220336891328465 and https://www.facebook.com/help/286027304749263
Get Permission First
Even though the group is Private / Secret, not every parent will want their kids to be photographed / videos for posting into the group. This can be a PIA, but when dealing with privacy, it needs to be covered. Most parents won’t care, and will actually want their kids to be posted for them to see in the group / class. But if you do get a child who cannot be posted, you’ll need to ensure he/she is not in any pictures or videos. My wife had one student last year who was not allowed and she literally had to do 2 sets of pictures / videos every time there was a group opportunity. She would have to pull him aside for “the facebook group shot” By the end of the year, he even knew the routine and removed himself at times.
Tip – when emailing your parents or sending home the “Facebook Group” form, include this “permission” with the rest of the information.
Before You Proceed – “Be Social”
With anything on social media, it’s only as good as you put into it (and this implies more than just being a lurker). Just like I consult with our clients / businesses, you must plan to use it, to actually “be social”. It does no good to waste all of your time and your parents time to create the group, only to go silent after the first week of school. For brands and businesses, not only is it wasteful, it can have a negative affect if your online/public/social media platforms are left out to die. People wonder if your business is also left out to die. I digress . . .
Also, Important Rule for the Group – Communication
How you communicate to your class (outside of Faebook) is important. There are all sorts of communication – physical letters / papers, phone calls, emails, etc. Not every parent will be in the facebook group. And also, the FB group is more social in nature. Therefore, it should not be used as the only or official mode of communication. However, it can “supplement” communications. For example:
- Do NOT post (only in your group) “Important! our class pictures were changed to Wednesday at 9am, not tomorrow morning”
- Instead, you should send your emails, make your phone calls, etc. as you normally would outside of social media for your official mode of communication and only then, you can post to the FB group and I would write something along the lines of “As you should have received via email a bit ago, we are moving our class pictures . . . . “ Again, it should supplement, not replace. This is true for any organized group, not just for teachers / schools. If you did have 100% of your parents (or users) in the group, you could shift over to using FB as a primary mode, but everyone would have to be in agreement and knowledgeable of this fact. Just like you would setup procedures and expectations of any mode of communication.
How To Create a Facebook Group for your Classroom
Finally! Here is the nitty gritty. There are a few critical steps, especially around privacy controls. NOTE: the screenshots and process where captured in August of 2019. I know for a fact that Facebook (and others) are constantly changing their methods and procedures. Generally speaking, however, the overall concepts have remained unchanged.
First, Determine “Who” creates & manages this group, Person or Page
When my wife started creating groups early on, she was worried that she would be getting friend requests from all of her parents so we first created a Facebook Page for her and her classroom (A facebook page is like a public entity, and can be managed by multiple people. And those people are not shown to the world. For example, do you see or know the person who runs the Starbucks or Nike pages?) We then created the group owned by the page. That way, parents could never see or get to my wife personal profile and ask her to be their friends.
But as time went on, we realized that most parents don’t want to be “friends” in the social media sense. I also believe that those of us who have been on Facebook for any decent amount of time are “friended” out (similar to “liking” pages and brands) so people are not as needing to friend everyone they develop a relationship with. But more important, we crafted a nice message to the parents in telling them up front that she generally does not accept friend requests from those who are not “friends” in the true sense. I think in the last 2 years since doing this, she has never gotten a friend request from a parent she has not truly been friends with.
One more note – many articles and people recommend that you create a “Teacher” facebook account. Technically, this is a violation of Facebook guidelines and should be avoided otherwise you risk getting kicked off. Plus, it would be a bit hard to manage on a day to day basis which account you’re using or logged in with. Some say “only use your school account when you’re logged in at school on your computer” But running a facebook group, well that is, requires you to be using your phone to take pictures, upload videos, etc. So you’d have to log in/out of your phone app whenever going back and forth. it’s just not feasible on any level.
Onward… let’s create a facebook group for teachers.
Step 1: Create New Group
Navigate to Facebook Groups at https://www.facebook.com/groups/
Click “Create New Group”.

Create a name for your group. I recommend a standardized approach so it is obvious to you and parents which group you’re dealing with, and one that can be used again for future years such as [School Name/Initials] [Room or Teacher Name], [School Year YYYY-YYYY]. For my wife this year, it was “EBS TK Room XXX, 2019-20”.
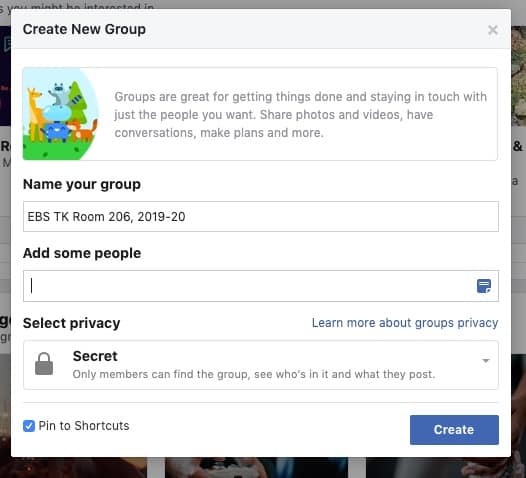
Add some people – you do not have to add anyone at this stage, but you can. You might want to add your spouse if he’s going to be involved, or maybe a parent friend if you already know someone who’s going to be in the group. Or maybe you want your fellow teachers to be in, or maybe an administrator or principal so they can be involved as well. At the end of the day, this is optional. Since this is my spouse’s group, I immediately add her.
Select Privacy – IMPORTANT – you must select “Secret” as this is the “private” group type you will want to use.
If you want the group to be easily accessible from your desktop / sidebar which i assume you will if you plan to use the group regularly, then select “Pin to Shortcuts” You can easily remove it later, say at the end of the year.
Click Create.
Step 2: Change Group Photo
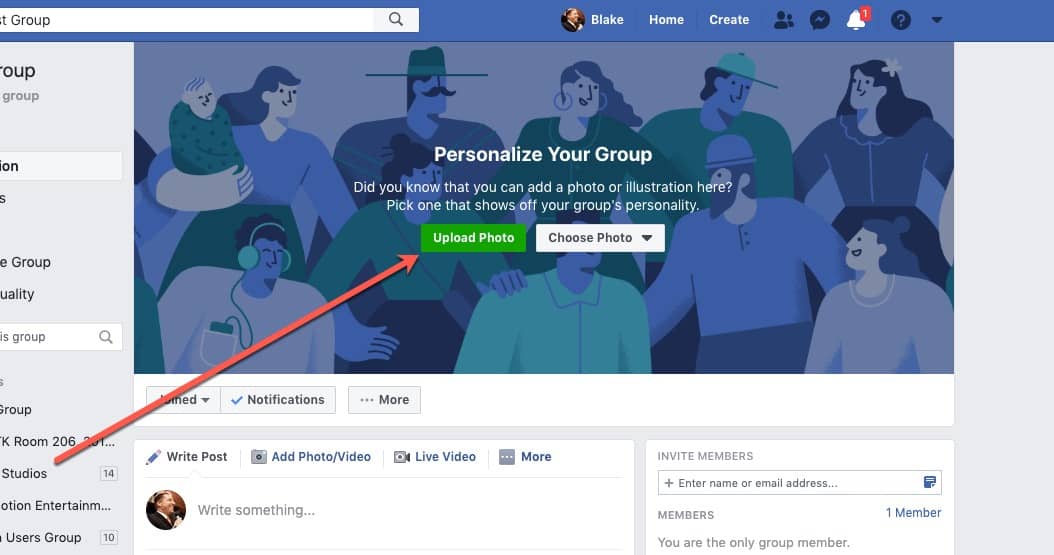
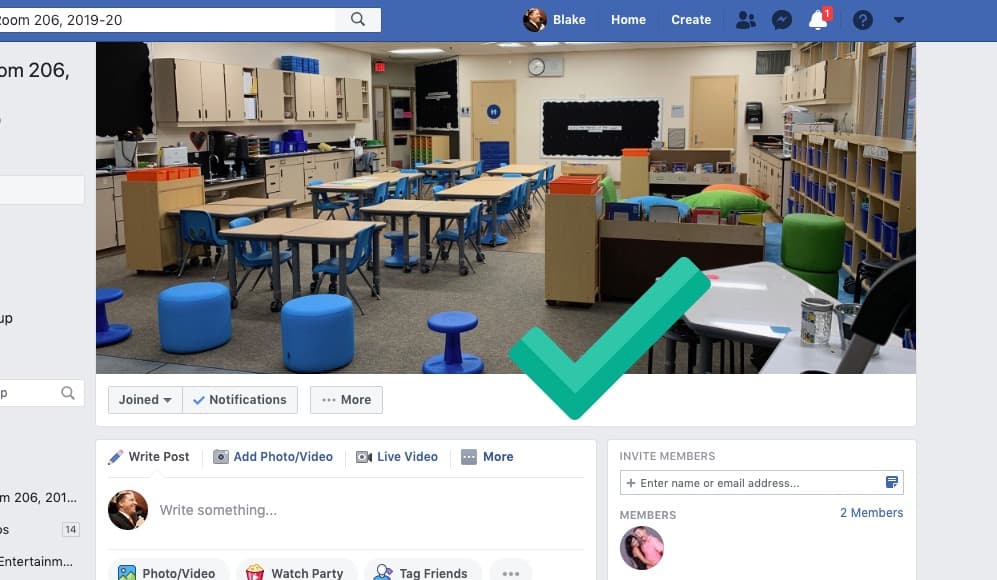
The first screen you see after creating a group is the group photo with a big button asking you to change it, so let’s get that out of the way. It’s easy. Click the upload photo button. I recommend a picture of your classroom, minus kids. Or the school. (I’m not a fan of cheesy sunsets. Keep it personalized to your actual classroom, but not you. I guess it could be a selfie of you with your classroom in the background.
Step 3: Adjust Group Settings
There are a few important settings to adjust before proceeding. I will only comment on the ones I feel should be changed or at least confirmed.
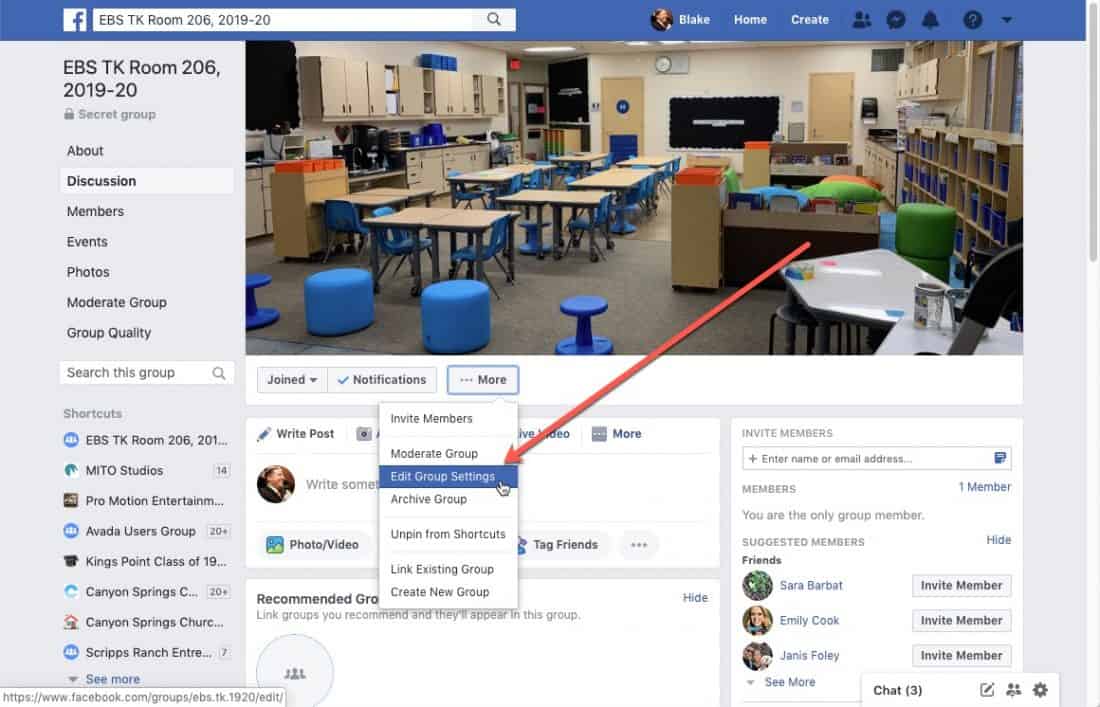
Access the settings by hitting the three dots / More button and clicking “Edit Group Settings” It will take you to https://www.facebook.com/groups/xxxxxxxxxxxxxx/edit/ where the xxxxxx is your group ID number. (Don’t worry, we’ll change that in a few steps)
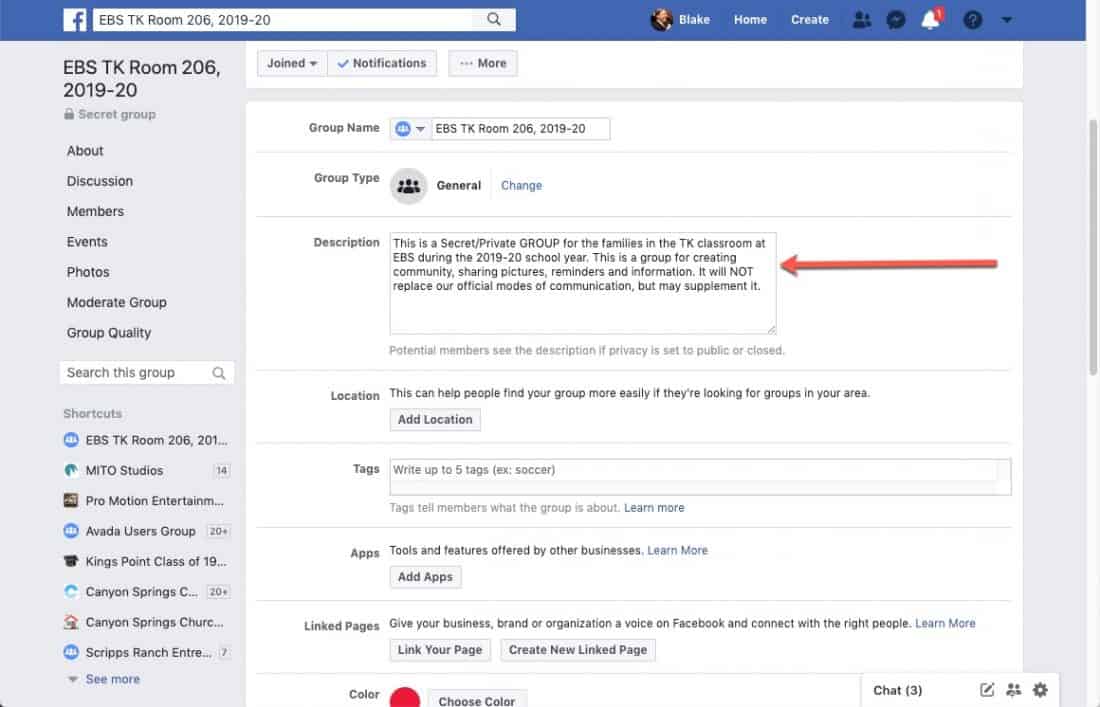
Add a description. Keep it vague but communicate what is is. I recommend highlighting the fact that it’s private/secret to reaffirm to your parents that it is indeed secret. You are more than welcome to use ours
This is a Secret/Private GROUP for the families in the XXXX classroom at YYYYY during the 2019-20 school year. This is a group for creating community, sharing pictures, reminders and information. It will NOT replace our official modes of communication, but may supplement it.
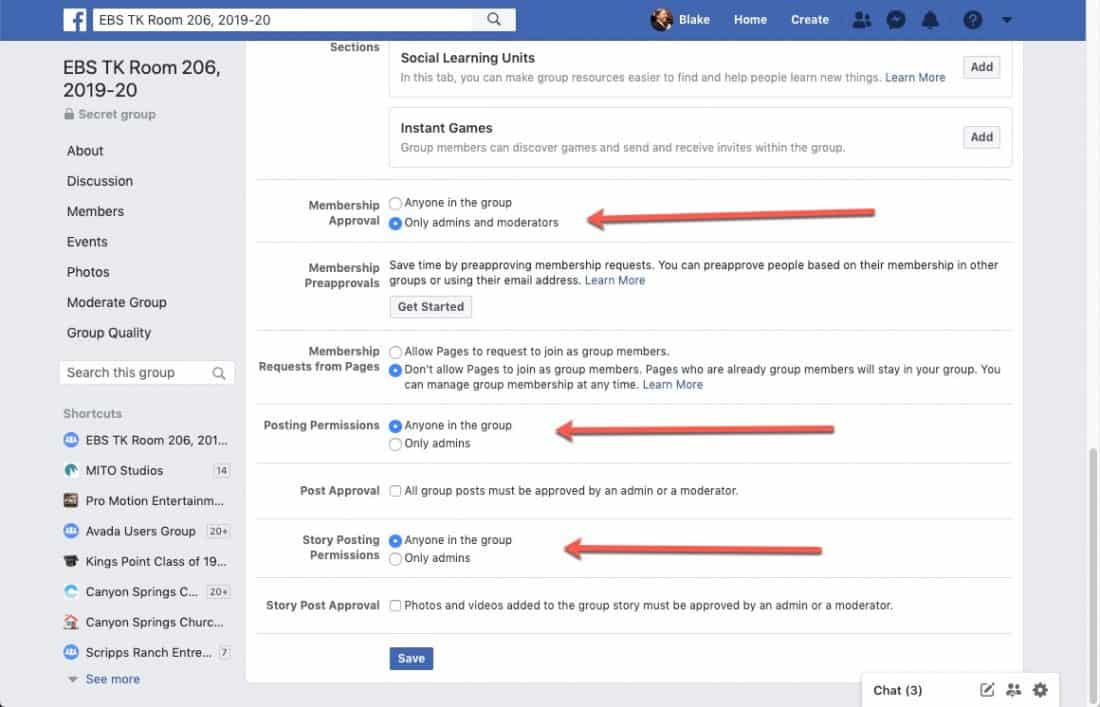
Membership Approval – This controls who else can approve (or invite) members. Ensure it’s set to “Only admins and moderators”.
Posting Permissions – You want this group to be social, right? Ensure it’s set to “Anyone in the group” I never understand when someone doesn’t want others to post and share in the group.That kind of flies in the face of “being social”.
Story Posting Permissions – same. Set to “Anyone in the group”.
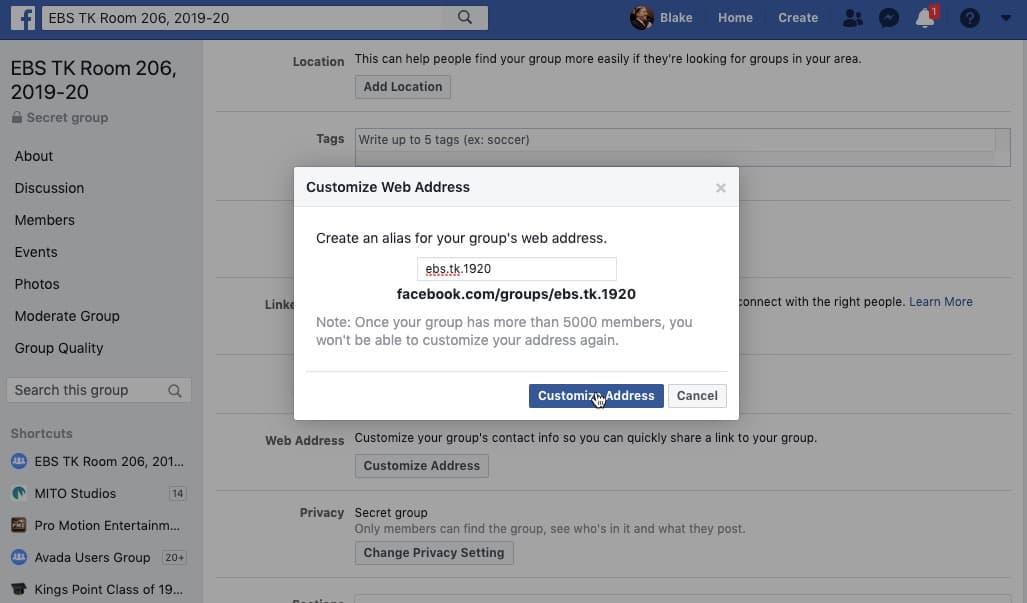
Web Address – I highly recommend setting a web address. (The url that you put in the website / search bar) It help identify the page, and just looks better than a random string of 16 numbers. Similar to the name, I recommend using a standardized approach. Just keep it short such as /ABC-XYZ-19-20/ where ABC is the school name, XYZ is the classroom or teacher name or abbreviation and 19-20 is the year. For example /North-Elem-Room304-19-20/ For next year, you can keep the same format, but just change the url to “20-21” That will help you and others easily identify the group.
Step 4: Invite Members
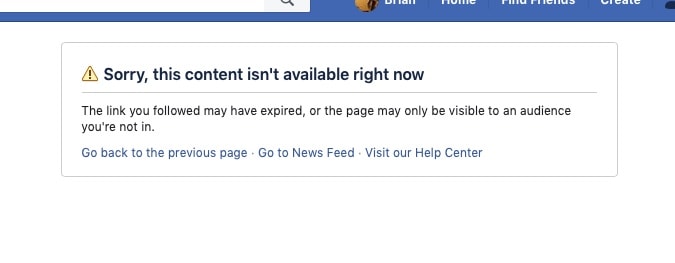
Because the Facebook Group is Secret / Private, getting your parents into the group is the trickiest step and requires some work. Remember, one of the good benefits of a secret group is that people cannot find or access the group at all. Even if they know the address/url, they will be presented with a “Sorry, this content isn’t available right now” message.
From the right hand side of the group page, click “Invite Members”
You can easily add any facebook “friend” by simply selecting them from the dropdown list. But remember, you are not friends with most if not all of your parents.
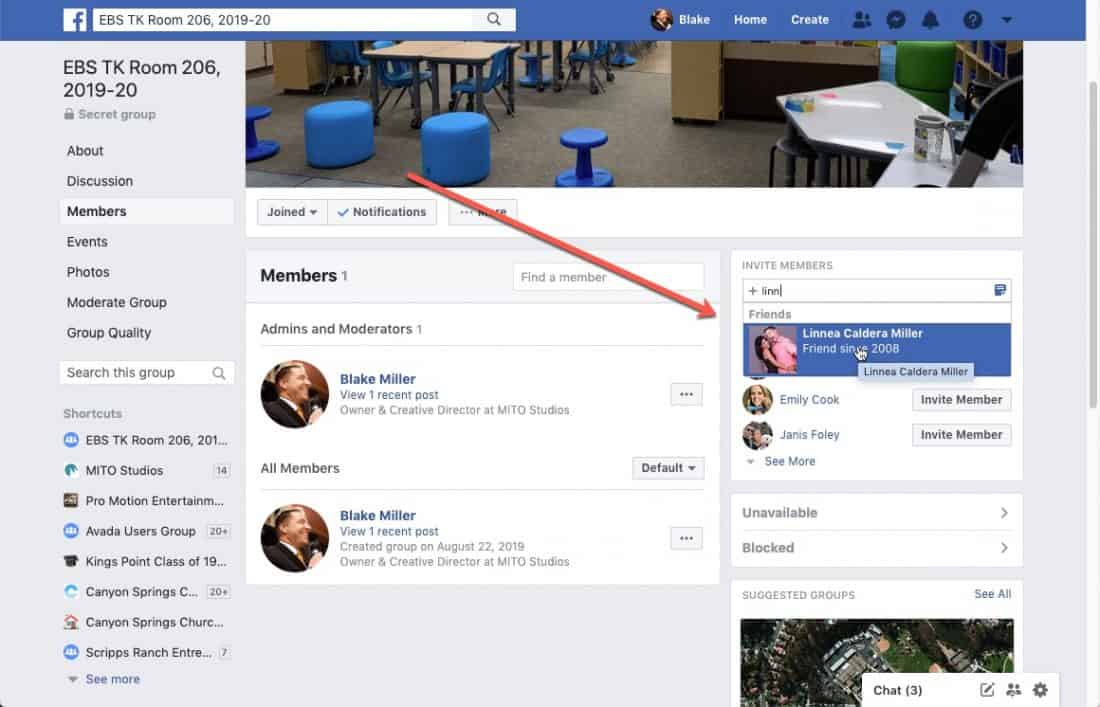
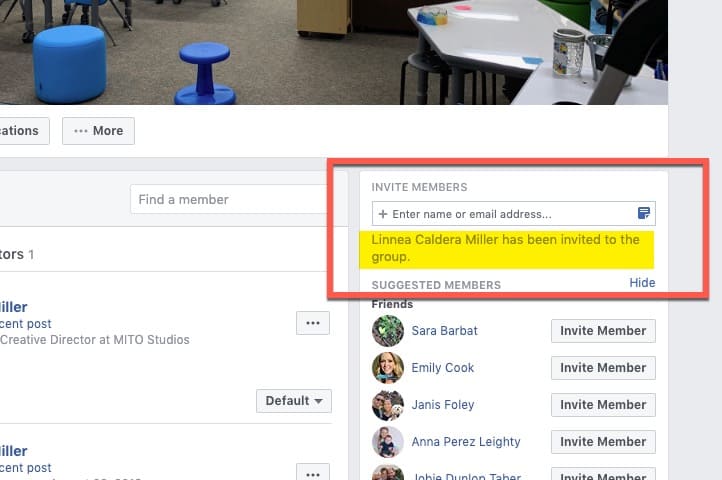
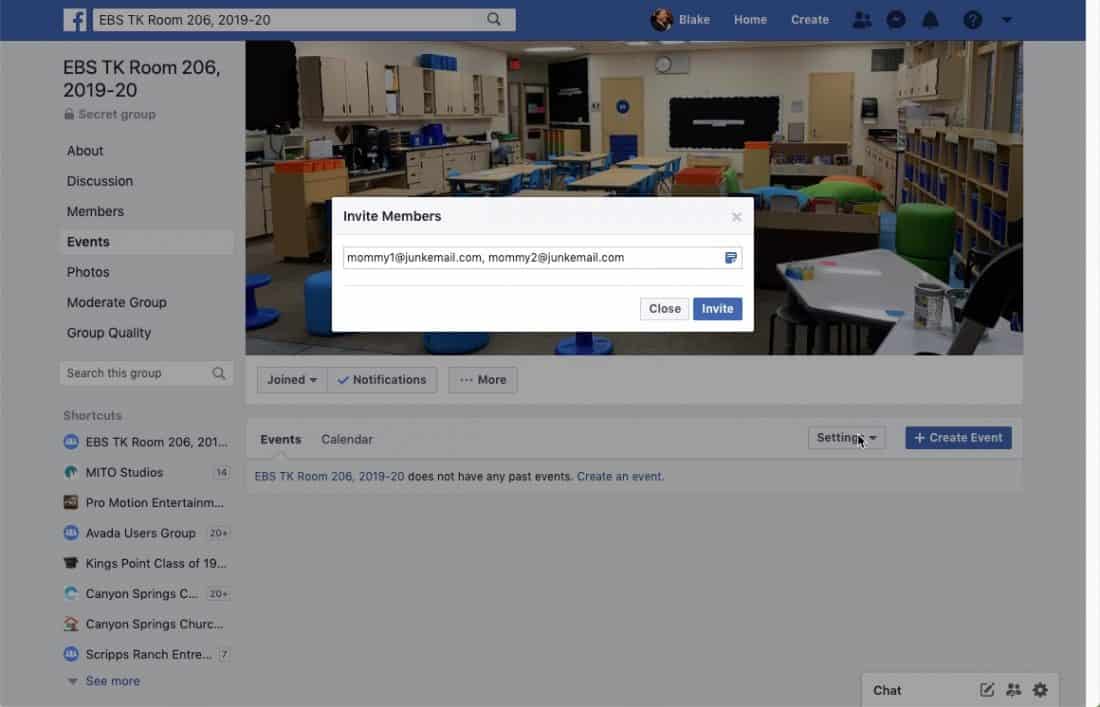
IMPORTANT: The ONLY way you can invite your non-friend parents (and anyone else) is by email address.
Note – there is a “Upload pre-approved list of members” in the group settings, but as of this writing, it did not work with a secret group. The only way was to be invited by email. And that email address MUST be their Facebook email address. This is important because you might have mom and/or dad’s work email address, or they might use a different email address for Facebook than everything else. Therefore, you must collect all of the facebook email addresses from your parents. (When you send your parents the email that announces and describes the private facebook group, you can request them to reply with their FB email address if it’s different than the one you already have on record.
Click in the invite members box and enter in their email addresses. You can enter multiple at a time, just separate by commas. (it might help to have all of their addresses in a separate document already typed and with commas so you can copy / paste it. You never know when you might need that comma separated list again, plus if anything goes wrong with the entry, you can easily do it over again.
In my testing, I found that if you are friends with someone you invited, they will also receive notifications in their facebook account (the bell upper right, and a pop-up lower left. You may also see the invite in your regular wall feed.
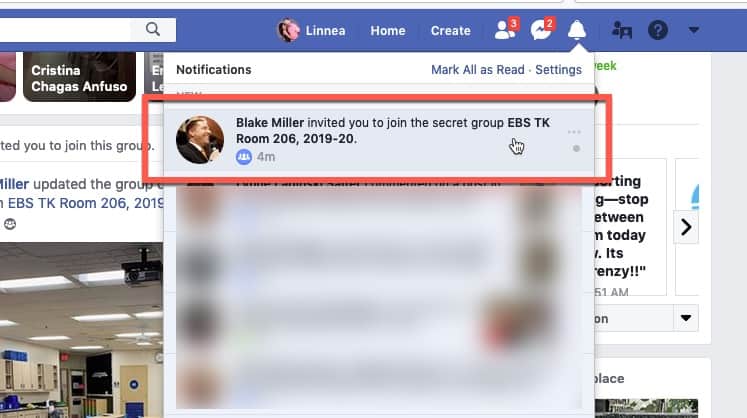
This will not be the case for the majority of your parents – who are invited by email only.
The recipients will receive an email notification. IMPORTANT – the only way to accept into the group is to click on the link/button in the email. Even though they have been invited, they cannot bypass the email and go to the page / url.
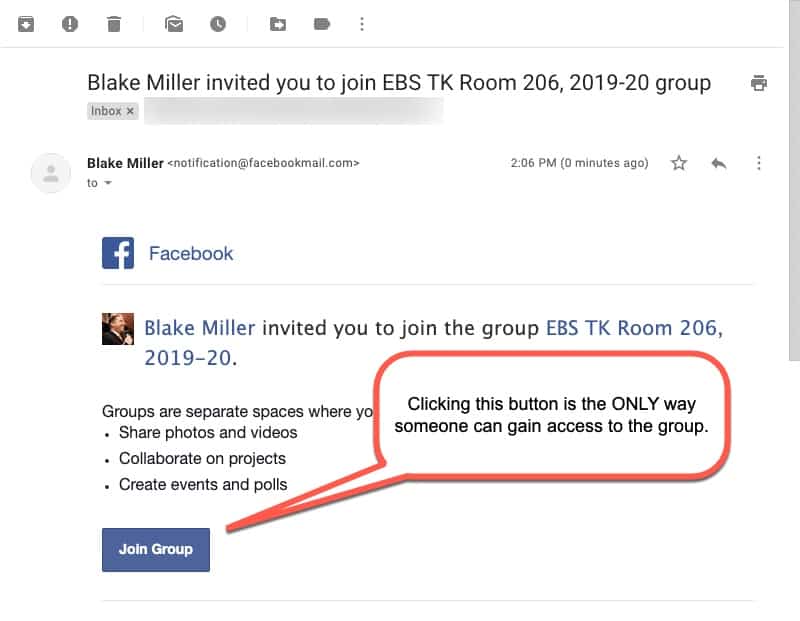
Even after clicking on the email, they then have to take one more step in Accepting into the group.
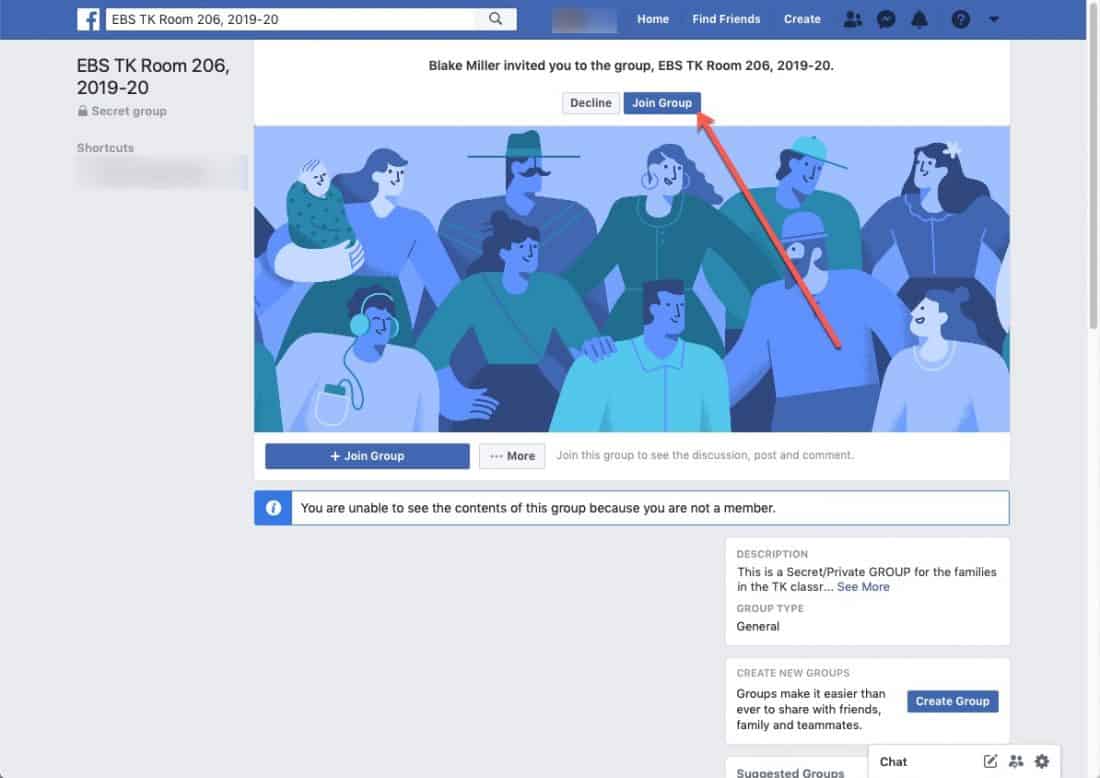
Almost every year, there are a few parents/users that take a few tries to get into the group – unfortunately that’s the price we pay to have it secret/private. So be patient!
Step 5: Announce Your Group & Set Guidelines
You’ll want to explain, announce and promote the group to your parents. You might discuss it early on in open house or orientation. (My wife does – she has a few slides in her presentation discussing it) But you’ll want to share the details and instructions directly with your parents. You’ll also want to lay out some basic ground rules, especially the whole “Friending” part.
Here is a sample letter / email you can use to send to your parents – https://docs.google.com/document/d/1b6TKkc1a4sNKXLrB5mfaXywz7p5CEjODCstuxffTCpo/edit?usp=sharing
Step 6: Assign an additional Admin (Optional)
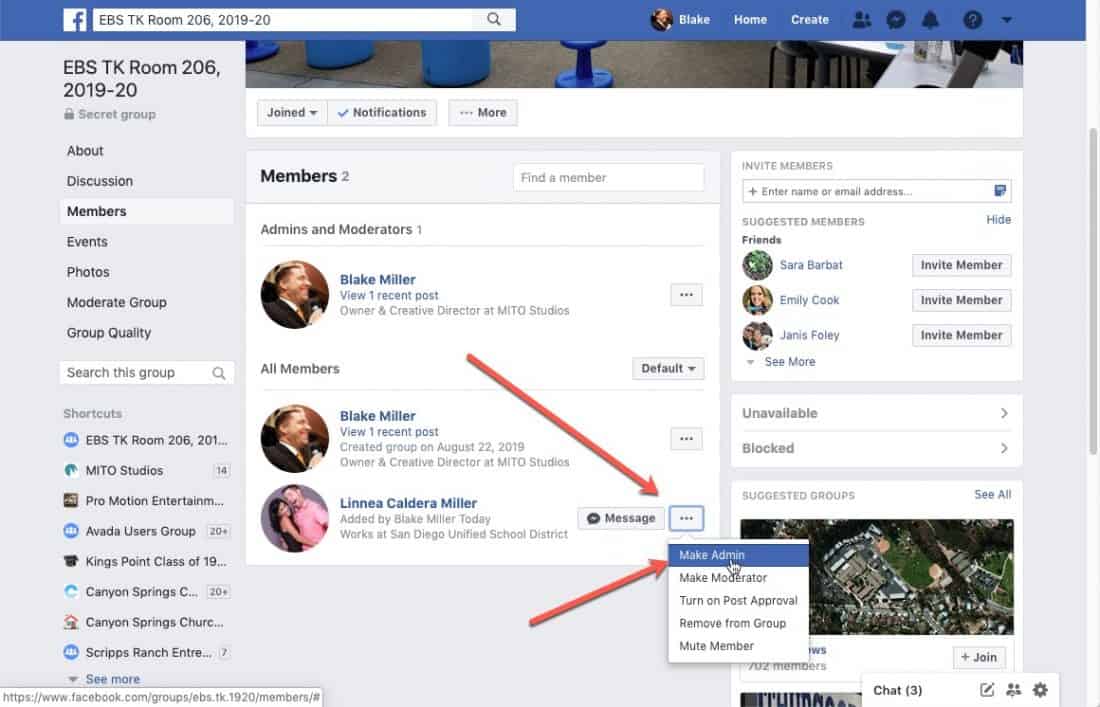
It may be helpful to have an additional admin to your group to help manage and “administer” the group. Kind of as a “backup” For professional groups or paid groups, it is highly recommend to have multiple admins because if the only admin gets his/her account shut down, deleted or banned for whatever reason, the Facebook Group will be left without anyone to manage it, practically killing it. This is not a huge point with teacher / classroom facebook groups because if the teach gets kicked off FB, there isn’t much left to worry about anyway. Though you could make the argument that the other admin could continue running the group. For your classroom group, an additional admin might be your spouse as a backup, or maybe you have an active room mom who knows his/her way around Facebook well and can actually provide help to you and your group. Whatever the reason, it’s easy to assign someone admin rights.
Ideas for Your Facebook Group
- Lots of ways to share, engage, have fun with, communicate and build trust with your parents
- Post pictures of the first day of school
- Create a poll asking their children’s favorite playtime activity
- “Go Live” when the kids are singing a song
- Post reminders about upcoming events or activities
- Wish Happy Birthdays to students
- Highlight a student or better, their family
Do you have other ideas? Post them below in the comments.
Have Fun, Connect with Your Parents
There are other areas in your group that you can customize (such as the color) and other aspects. Spend some time learning how groups work. Facebook actually has a lot of help articles on using groups. Once up and running and have a group full of engaged parents, have fun with it!


Is nice to me end intersting
Thank you for your support Blake Miller. I really appreciate that.
Our school set up private Facebook groups for each classroom. I found that if the administrator accesses the group on a mobile device, you can copy link to group. In global email to each group, we sent an invite with the link to each specific group. It worked so well! It’s odd that this option is not available when accessing the groups on a computer! Anyway, thanks for the article, It aligned with what we created here and we’ve had fun with it!
When going Facebook live, can this be seen only by the people in the group?
Thank you for this. I will be creating for my class too.
Thanks, it helps me a lot.
hye,im from malaysia. im also creating fb groups for my classes.i think using fb group is more interactive.unfortunately not every people agree with me. bythe way .thank you for having same mind :)
Glad you like it, Kyrie.
Blake,
Thanks for your explanation and tutorial. Like Lindsay, I’m finding myself creating a group. A couple of questions though:
– In the “First, Determine “Who” creates & manages this group, Person or Page” section, what kind of page are you referring? I have a personal page which I’ve used for years. Would I link my personal page to my newly-formed group?
Hi Kyle. A group can be managed by a Page or a Person (individual profile). You can learn more here https://www.facebook.com/help/337881706729661 or here https://whatis.techtarget.com/definition/Facebook-page Basically, a Page is a publically accessible entity where the people to own, manage and control the page are hidden from the public. Whereas your individual profile (aka “person”) is not.
You say “personal page” which can actually mean both. So unless you created a page (as defined above) for your persona / personal brand, then I assume you are talking about your personal profile.
Can I submit email address parents have already given me for communication purposes, or does it have to be a FB email address. I’m not sure where to access those and how to relate this to parents.
Hi Dede. The email addresses used to invite them to the page must be their Facebook email address. If you do not have it, you should email them as you normally would and ask them to provide you with their FB address. A sample is provided in the example email/letter that I referenced in the artcile.
Hi,
thanks for your helpful article. I am creating an FB group during these uncertain times of school closures. I set mine to Private but don’t see an option for secret.
Hi Lindsey. Thank you for visiting. Facebook made some changes recently and I have not updated my article yet. I will do that soon. There are only 2 settings now: Public and Private. You will want to select Private as that is the same as what Secret used to mean. You can learn more here. https://www.facebook.com/help/220336891328465
This is a useful information page but |PLEASE DO NOT ASSUME that every parent is on Facebook – I’m not!!!! And had no wish to be, but as I’ve joined my child’s school parent group I’m having to delve into this world and find out more. But frankly feel insulted and alienated by your repeated comment of “what parent isn’t on facebook?”
Thank you for visiting my blog and taking the time to comment. I’m sorry you feel insulted and alienated over this helpful resource article.